2024.07.12 - [Embedded LAB Semina] - 특정 객체 구별 및 로봇의 시야 추정
이전 글에서 추가된 코드
def find_red_position_in_1st_direction(self, blue_dots, red_dot):
        blue_dots = sorted(blue_dots, key=lambda x: x[1])  # y 좌표 기준으로 정렬

        if red_dot[1] < blue_dots[0][1]:
            return "case1"
        elif red_dot[1] < blue_dots[1][1]:
            return "case2"
        else:
            return "case3"
blue_dots 리스트를 y 좌표를 기준으로 정렬하여 세로 방향에서 파란색 점들이 어떤 순서로 있는지를 확인한다.
- 빨간색 점의 y 좌표(red_dot[1])를 정렬된 파란색 점들과 비교하여 빨간색 점이 첫 번째 파란색 점보다 위에 있으면 case1을 반환한다.
- 빨간색 점이 첫 번째 파란색 점과 두 번째 파란색 점 사이에 있으면 case2를 반환한다.
- 빨간색 점이 두 번째 파란색 점보다 아래에 있으면 case3을 반환한다.
[python] sorted 함수란?
sorted(iterable, key=None, reverse=False)
- iterable: 정렬할 반복 가능한 객체
- key: 각 요소에 대해 호출할 함수. 이 함수의 반환값을 기준으로 정렬함 (기본값: None)
- reverse: True인 경우 내림차순으로 정렬 (기본값: False)
lambda 함수는 이름이 없는 익명 함수로, lambda 매개변수: 표현식의 형태로 쓰인다.
lambda x: x[1]에서 x는 리스트의 각 요소를 나타내고, x[1]은 요소 x의 두 번째 값을 반환한다는 것이다. 이때 x는 (cX, cY) 형식의 좌표이므로, x[1]은 y 좌표이다.
>> 즉, 로봇이 처음에 인식한 방향이 2번 방향일 경우, x 좌표를 이용하여 정렬하고, case 구분을 하면 각 경우가 구분 가능할 것으로 생각된다.
run 매서드는 약간 수정
def run(self):
    while True:
        image = self.get_image()
        if image is None:
            break

        blue_mask = self.preprocess_image(image, self.blue_lower, self.blue_upper)
        blue_dots, blue_contours = self.find_dots(blue_mask)

        red_mask = self.preprocess_image(image, self.red_lower, self.red_upper)
        red_dots, red_contours = self.find_dots(red_mask)
        red_dot = red_dots[0] if red_dots else None

        direction = self.determine_direction(blue_dots, red_dot)

        if direction == "1번 방향" and red_dot:
            red_position = self.find_red_position_in_1st_direction(blue_dots, red_dot)
            print(f"1번 방향, 빨간 점 위치: {red_position}")
        else:
            print(f"Robot is facing the {direction} of the field.")

        # Draw contours around the blue and red dots
        cv2.drawContours(image, blue_contours, -1, (0, 255, 0), 2)
        cv2.drawContours(image, red_contours, -1, (0, 0, 255), 2)

        for dot in blue_dots:
            cv2.circle(image, dot, 5, (0, 255, 0), -1)

        if red_dot:
            cv2.circle(image, red_dot, 5, (0, 0, 255), -1)

        cv2.imshow('Direction', image)
        cv2.imshow('Blue Mask', blue_mask)
        cv2.imshow('Red Mask', red_mask)

        if cv2.waitKey(1) & 0xFF == ord('q'):
            break

    cv2.destroyAllWindows()
기존의 방향 결정 후(이전의 코드) 만약 방향이 "1번 방향"이고 빨간색 점이 검출된 경우,
find_red_position_in_1st_direction 메서드를 호출하여 빨간색 점의 위치를 확인하고 이를 출력한다.
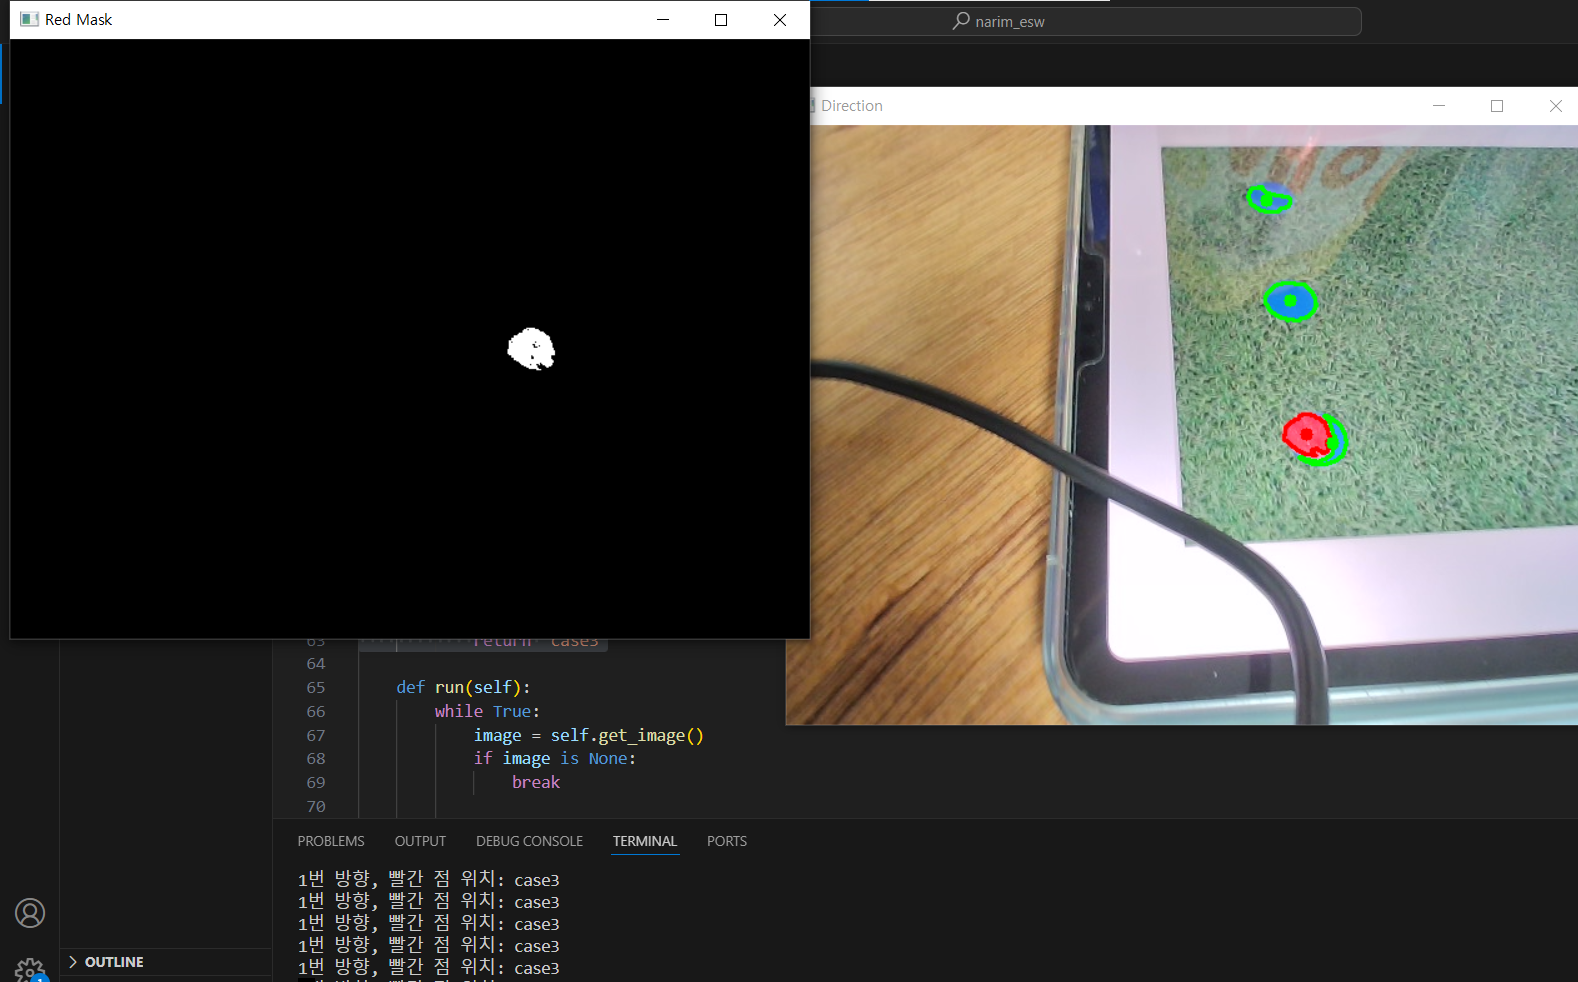
실행 결과
같은 방식으로 2번 방향에 대해서도 코드를 추가한 내용(전체 코드 참고)은 아래와 같다.
전체 코드
import cv2
import numpy as np

class DirectionDetector:
    def __init__(self, camera):
        self.camera = camera
        self.blue_lower = np.array([100, 150, 50])  # 파란색 하한값
        self.blue_upper = np.array([140, 255, 255])  # 파란색 상한값
        self.red_lower = np.array([170, 140, 150])  # 빨간색 하한값
        self.red_upper = np.array([180, 255, 255])  # 빨간색 상한값

    def get_image(self):
        ret, frame = self.camera.read()
        if not ret:
            print("Failed to capture image")
            return None
        return frame

    def preprocess_image(self, image, lower, upper):
        hsv = cv2.cvtColor(image, cv2.COLOR_BGR2HSV)
        mask = cv2.inRange(hsv, lower, upper)
        return mask

    def find_dots(self, mask):
        contours, _ = cv2.findContours(mask, cv2.RETR_EXTERNAL, cv2.CHAIN_APPROX_SIMPLE)
        dots = []
        for contour in contours:
            if cv2.contourArea(contour) > 10:  # 작은 노이즈 제거
                M = cv2.moments(contour)
                if M['m00'] != 0:
                    cX = int(M['m10'] / M['m00'])
                    cY = int(M['m01'] / M['m00'])
                    dots.append((cX, cY))
        return dots, contours

    def determine_direction(self, blue_dots, red_dot):
        if len(blue_dots) < 2 or not red_dot:
            return "Cannot determine direction. Not enough dots detected."

        # 모든 점들을 포함한 직선 검출
        dots = blue_dots + [red_dot]

        # x 좌표 차이와 y 좌표 차이를 계산하여 방향 결정
        x_coords = [dot[0] for dot in dots]
        y_coords = [dot[1] for dot in dots]

        x_diff = max(x_coords) - min(x_coords)
        y_diff = max(y_coords) - min(y_coords)

        if x_diff > y_diff:
            return "2번 방향"  # 가로로 정렬됨
        else:
            return "1번 방향"  # 세로로 정렬됨

    def find_red_position_in_1st_direction(self, blue_dots, red_dot):
        blue_dots = sorted(blue_dots, key=lambda x: x[1])  # y 좌표 기준으로 정렬

        if red_dot[1] < blue_dots[0][1]:
            return "case1"
        elif red_dot[1] < blue_dots[1][1]:
            return "case2"
        else:
            return "case3"

    def find_red_position_in_2nd_direction(self, blue_dots, red_dot):
        blue_dots = sorted(blue_dots, key=lambda x: x[0])  # x 좌표 기준으로 정렬

        if red_dot[0] < blue_dots[0][0]:
            return "case1"
        elif red_dot[0] < blue_dots[1][0]:
            return "case2"
        else:
            return "case3"

    def run(self):
        while True:
            image = self.get_image()
            if image is None:
                break

            blue_mask = self.preprocess_image(image, self.blue_lower, self.blue_upper)
            blue_dots, blue_contours = self.find_dots(blue_mask)

            red_mask = self.preprocess_image(image, self.red_lower, self.red_upper)
            red_dots, red_contours = self.find_dots(red_mask)
            red_dot = red_dots[0] if red_dots else None

            direction = self.determine_direction(blue_dots, red_dot)

            if direction == "1번 방향" and red_dot:
                red_position = self.find_red_position_in_1st_direction(blue_dots, red_dot)
                print(f"1번 방향, 빨간 점 위치: {red_position}")
            elif direction == "2번 방향" and red_dot:
                red_position = self.find_red_position_in_2nd_direction(blue_dots, red_dot)
                print(f"2번 방향, 빨간 점 위치: {red_position}")
            else:
                print(f"Robot is facing the {direction} of the field.")

            # Draw contours around the blue and red dots
            cv2.drawContours(image, blue_contours, -1, (0, 255, 0), 2)
            cv2.drawContours(image, red_contours, -1, (0, 0, 255), 2)

            for dot in blue_dots:
                cv2.circle(image, dot, 5, (0, 255, 0), -1)

            if red_dot:
                cv2.circle(image, red_dot, 5, (0, 0, 255), -1)

            cv2.imshow('Direction', image)
            cv2.imshow('Blue Mask', blue_mask)
            cv2.imshow('Red Mask', red_mask)

            if cv2.waitKey(1) & 0xFF == ord('q'):
                break

        cv2.destroyAllWindows()

# Example usage:
camera = cv2.VideoCapture(1)  # Assuming the first camera device
detector = DirectionDetector(camera)
detector.run()
camera.release()
'Embedded LAB Semina' 카테고리의 다른 글
| 공까지의 거리 추적하기(3) (0) | 2024.07.27 |
|---|---|
| 공까지의 거리 추적하기(2) :: 발돋움,, 이미지 캡쳐 + 카메라 캘리브레이션 (0) | 2024.07.26 |
| 공까지의 거리 추적하기(1) (0) | 2024.07.16 |
| 초록색 필드 구별하기(구별된 영역 위의 객체만 추적하도록) (0) | 2024.07.16 |
| 특정 객체 구별 및 로봇의 시야 추정 (0) | 2024.07.12 |


